Showing posts with label painting. Show all posts
Wednesday, September 21, 2011
I am an artist …
Grace LOVES to paint and draw and color and do anything artsy. She wanted to paint last weekend and so I indulged. And I took these photos of her (and her paintbrushes) …
Labels:
art,
painting,
photography
Tuesday, February 1, 2011
a Short {and not so exciting} Tale of 2 Tables ...
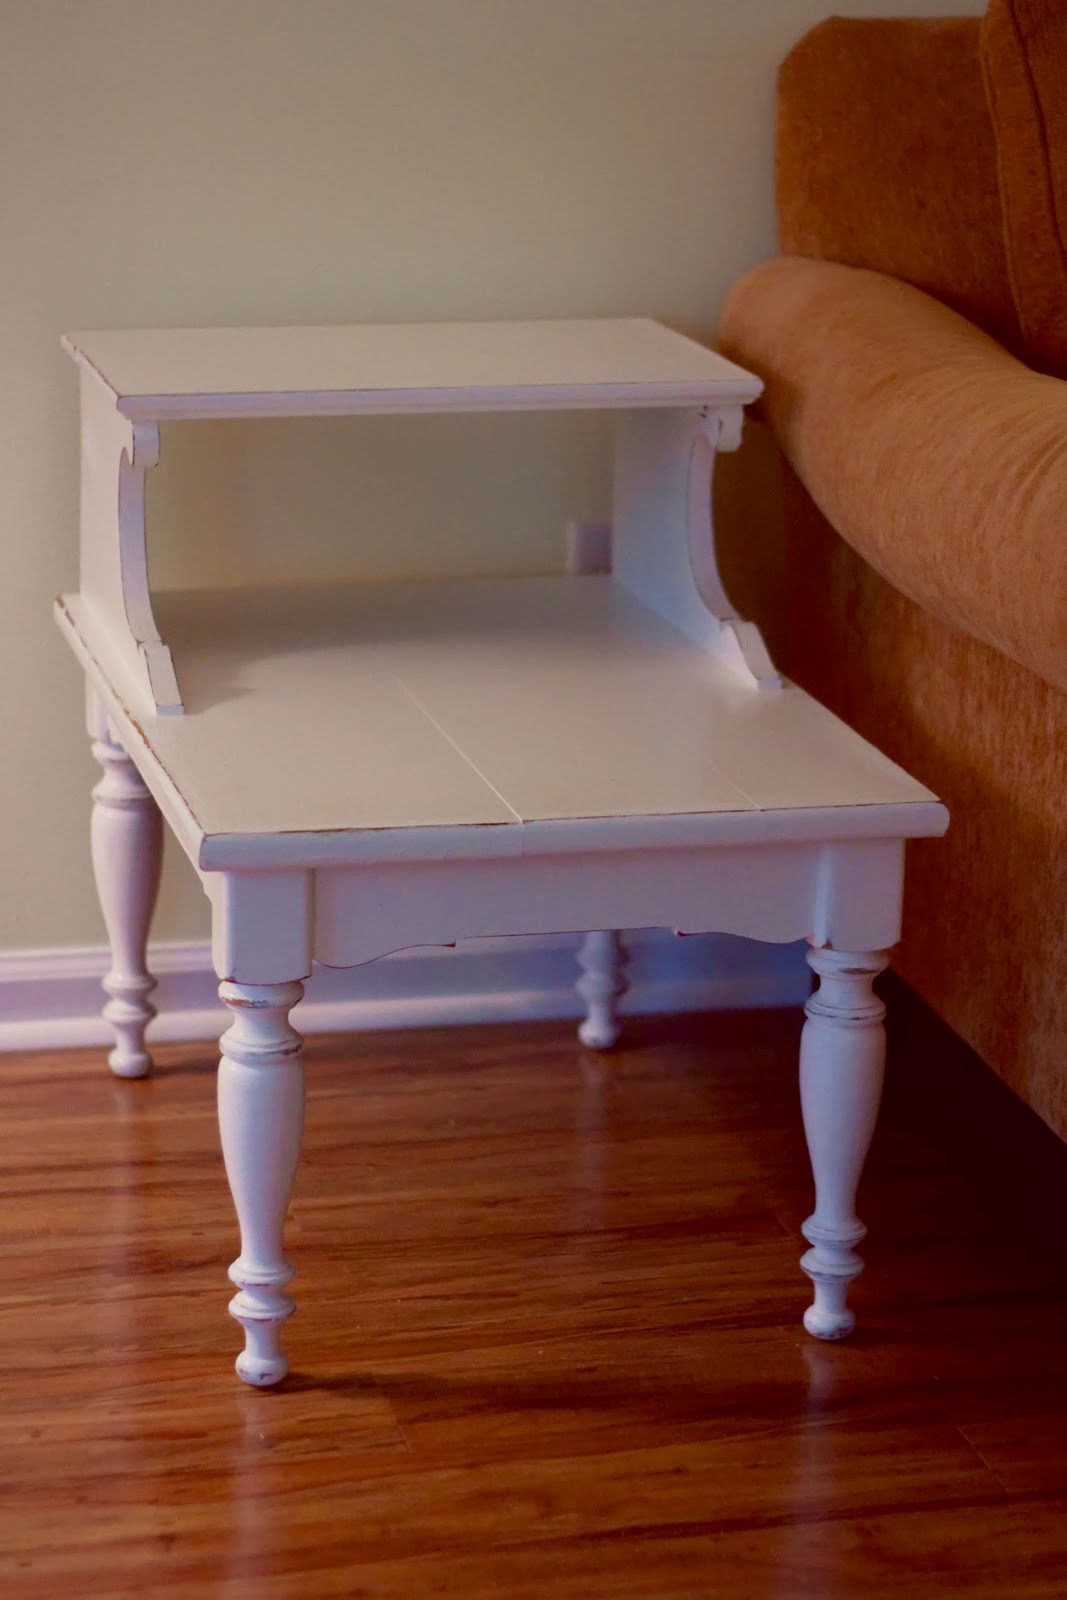
I have long loved antiques … retro furnishings … anything old that has a story. And earlier in the summer I saw these tables at an antique store in Monroe. I didn't get them then (they were $40 for the pair), but I continued to see them in my mind, painted and flanking either end of my sofa. They had great potential. Then we went hunting at that same place for these chairs and I saw the tables again. This time they were marked to $25 for the pair and I brought them home. They sat in my garage for weeks and weeks. And the paint sat beside them. But now they are in their final home … beside my sofa, and I ♥ them!
I apologize in advance for the terrible pix! It was rainy when I took the before photos in my garage (great lighting!) and it was dark when I took the afters in my house. Oh, and I wanted to get them done, so I didn't bother to switch out my lens from the 50mm. Yeah … I was in a hurry. Sorry. But I think you'll get the picture … :)
Before:
Sanding …
During:
Lovely gray primer … but I do adore Painter's Touch by Rustoleum!
After:
They've been painted "Popcorn" and distressed by hand. The paint job isn't excellent, but that's for a reason. I wanted them to look like they have been through a lot and loved :)
I like the details on these tables. They go in the living room perfectly. Now I need an old phone for that empty one on the left, don't you think? Ahhh … more antique hunting in my future! Twist my arm ;)
I apologize in advance for the terrible pix! It was rainy when I took the before photos in my garage (great lighting!) and it was dark when I took the afters in my house. Oh, and I wanted to get them done, so I didn't bother to switch out my lens from the 50mm. Yeah … I was in a hurry. Sorry. But I think you'll get the picture … :)
Before:
Sanding …
During:
Lovely gray primer … but I do adore Painter's Touch by Rustoleum!
After:
They've been painted "Popcorn" and distressed by hand. The paint job isn't excellent, but that's for a reason. I wanted them to look like they have been through a lot and loved :)
I like the details on these tables. They go in the living room perfectly. Now I need an old phone for that empty one on the left, don't you think? Ahhh … more antique hunting in my future! Twist my arm ;)
Labels:
antique,
decorating,
painting
Tuesday, October 26, 2010
Before and After: Lamp Table Lamp
I knew I wanted one of those … what do you call them … Lamp Table? Table Lamp? Lamp Table Lamp?? I don't know … it's a table and lamp all in one. An antique one, not one of those, that, well you know what you're thinking. No. A wooden antique one.
And I found one when we went on our little anniversary trip. And no, I did not find it in Blue Ridge, I found it in Ellijay :)
It was so ugly … I think my mom thought I was losing my mind when I came home with this:
So I promptly ran to Home Depot and bought these:
And with a little of the above and a little sanding I now have this:
It turned out perfectly!! I wanted to make it look like it had been through a lot, and still have all it's quirky charm. So it has a layer of white, then a layer of blue, then another layer of white paint.
Oh, be still my ♥ I just ♥ making over vintage stuff! Now to make the lamp shade as cute as the lamp :)
And I found one when we went on our little anniversary trip. And no, I did not find it in Blue Ridge, I found it in Ellijay :)
It was so ugly … I think my mom thought I was losing my mind when I came home with this:
So I promptly ran to Home Depot and bought these:
And with a little of the above and a little sanding I now have this:
It turned out perfectly!! I wanted to make it look like it had been through a lot, and still have all it's quirky charm. So it has a layer of white, then a layer of blue, then another layer of white paint.
Oh, be still my ♥ I just ♥ making over vintage stuff! Now to make the lamp shade as cute as the lamp :)
Wednesday, March 31, 2010
Live and Learn ...
Every time I say "Live and learn" I have to finish it with "and then get Luvs." Ugh. The power of advertising! Anyway, I have lived and learned. And one thing that I always say is that a mistake isn't a bad thing if you learn from it.
So. I've made several mistakes lately when it comes to refinishing furniture. First, I followed what I thought was good advice because it was on the Young House Love website. It's a good site with good information, so I though that their info about painting wood furniture was correct. Let me just say that … it wasn't.

I sanded and painted two tables and the finish is, well, just OK. It's pretty thick and still, to this day, a little gummy and I followed their advice exactly. Fast forward to the day I painted a fabulous window seat/bookcase that my Dad built for me. I followed the same advice again and it turned out HORRIBLY. I cried it was so bad.
I found out later, after reading The Frugal Girl, that your best friend is Rustoleum Painter's Touch Primer. And it is. I love this stuff immensely!

Look at that fabulous woodgrain showing through! It adheres so incredibly well! I used it (and The Furgal Girl's instructions) when I refinished this:

And all is well … that play kitchen has Rustoleum Painter's Touch Primer and Rustoleum Painter's Touch semi-gloss paint. And it's fabulous! Oh, if only I had known. Oh, and I didn't put polyurethane on it!
Fast forward again to today. I just completed building this media base cabinet with my Dad.

It is incredible! That picture above is in the process before the final trim was applied. I ♥ it so much! We spent a lot of time on it and it means a lot to me, having built it with my Dad. So when it came time to paint it I wanted to make sure I did it right. Do you think I followed advice #1 or advice #2? That's right … I went with #2. I learned from my mistakes and there was no way I was gonna mess this up. Or so I thought!
I primed it (it was going so well) and painted it (again, going so well) and then yesterday I began to put water-bassed polyurethane (as recommended) on it. I figured since it would be in the living room it should have that extra protection. Plus I do like how it changes the look of this particular paint just a bit. So I waited the 3-4 hours between coats and then proceeded to do the next step that the can says - sand lightly with 220 grit sandpaper between coats. HA!!!!
Let's just say at least I was smart enough to test it out on an inconspicuous place first. OH THE HORROR! That step is so that the second coat of poly will adhere to the first coat. Apparently, that step is for when you are staining and not when you are painting. You see, it made the poly very grey and very dull. Eek!
I fixed it as best as I could. I then decided that was it. No more poly. Time for the poly to cure for 72 hours so I can finally finish this project. Later while reading some articles I came to find out that the true purpose of polyurethane is get into the grain of the wood and seal it. But applying it over paint is really kind of pointless as it doesn't really seal the paint. If you have prepared (sanded well) and primed (using Painter's Touch!) correctly, then your paint should adhere just fine and you shouldn't have any problems.
Mistake made … lesson learned. In the future it's all Rustoleum Painter's Touch for me! I wish they made it in 5-gallon buckets!
p.s. here's a sneak peak at the cabinet:

The paint is actually much darker, I was just playing around with photoshop :) Well, I'm off for another day of projects. Enjoy yours!
So. I've made several mistakes lately when it comes to refinishing furniture. First, I followed what I thought was good advice because it was on the Young House Love website. It's a good site with good information, so I though that their info about painting wood furniture was correct. Let me just say that … it wasn't.
I sanded and painted two tables and the finish is, well, just OK. It's pretty thick and still, to this day, a little gummy and I followed their advice exactly. Fast forward to the day I painted a fabulous window seat/bookcase that my Dad built for me. I followed the same advice again and it turned out HORRIBLY. I cried it was so bad.
I found out later, after reading The Frugal Girl, that your best friend is Rustoleum Painter's Touch Primer. And it is. I love this stuff immensely!
Look at that fabulous woodgrain showing through! It adheres so incredibly well! I used it (and The Furgal Girl's instructions) when I refinished this:
And all is well … that play kitchen has Rustoleum Painter's Touch Primer and Rustoleum Painter's Touch semi-gloss paint. And it's fabulous! Oh, if only I had known. Oh, and I didn't put polyurethane on it!
Fast forward again to today. I just completed building this media base cabinet with my Dad.
It is incredible! That picture above is in the process before the final trim was applied. I ♥ it so much! We spent a lot of time on it and it means a lot to me, having built it with my Dad. So when it came time to paint it I wanted to make sure I did it right. Do you think I followed advice #1 or advice #2? That's right … I went with #2. I learned from my mistakes and there was no way I was gonna mess this up. Or so I thought!
I primed it (it was going so well) and painted it (again, going so well) and then yesterday I began to put water-bassed polyurethane (as recommended) on it. I figured since it would be in the living room it should have that extra protection. Plus I do like how it changes the look of this particular paint just a bit. So I waited the 3-4 hours between coats and then proceeded to do the next step that the can says - sand lightly with 220 grit sandpaper between coats. HA!!!!
Let's just say at least I was smart enough to test it out on an inconspicuous place first. OH THE HORROR! That step is so that the second coat of poly will adhere to the first coat. Apparently, that step is for when you are staining and not when you are painting. You see, it made the poly very grey and very dull. Eek!
I fixed it as best as I could. I then decided that was it. No more poly. Time for the poly to cure for 72 hours so I can finally finish this project. Later while reading some articles I came to find out that the true purpose of polyurethane is get into the grain of the wood and seal it. But applying it over paint is really kind of pointless as it doesn't really seal the paint. If you have prepared (sanded well) and primed (using Painter's Touch!) correctly, then your paint should adhere just fine and you shouldn't have any problems.
Mistake made … lesson learned. In the future it's all Rustoleum Painter's Touch for me! I wish they made it in 5-gallon buckets!
p.s. here's a sneak peak at the cabinet:
The paint is actually much darker, I was just playing around with photoshop :) Well, I'm off for another day of projects. Enjoy yours!
Labels:
learning,
mistakes,
painting,
woodworking
Wednesday, March 24, 2010
It is Finished!
I know I haven't been posting my daily photos for the project 365, but I have been taking them! Maybe later, but right now I wanted to introduce you to:

She is finished! Remember what she looked like when I first brought her home?

She is so lovely. I couldn't wait to take pictures, so I took them even though the kitchen hasn't been carried up to the bonus room yet. Here are some more shots :)

She is finished! Remember what she looked like when I first brought her home?
She is so lovely. I couldn't wait to take pictures, so I took them even though the kitchen hasn't been carried up to the bonus room yet. Here are some more shots :)
Subscribe to:
Posts (Atom)